Two-Exposure Contrast Masking in Photoshop Elements
by Adrienne Cleveland
When I'm faced with a very high-contrast situation, I know that my camera may not
have enough dynamic range to capture an image that looks like the real scene. In that case,
I may shoot two exposures and use masking to combine them.
I wanted to shoot a "just-before-sunrise" shot, which I knew would have huge
dynamic range. I wanted to achieve a photo that would look like reality, and I knew that
I couldn't accomplish that with a "straight from the camera" shot.
To handle the contrast, I shot two exposures: one for the bright sky,
and another for the darker field, and used masking to combine them.
By the way, you need a sturdy tripod to make sure
the camera doesn't move between the exposures.
The Two Exposures
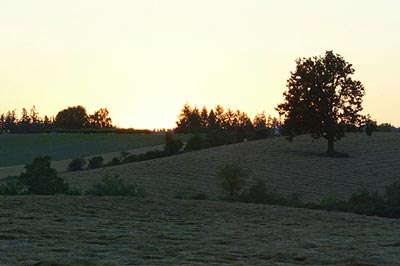
Sky Image: Exposed for the Sky

|
Field Image: Exposed for the Field
|
Combining the Images in Photoshop Elements
These are instructions for the process I used, but there are many other methods that would work. Also,
these instructions are written for the PC, and may require minor variations for the Mac. I'm going to refer to
the image exposed for the sky as the Sky image, and the other one as the Field image.
If you don't already have our free Layer Mask action installed,
go here to download and install it.
Open both images in Photoshop Elements. If you want to use our images for a test run, feel free to download them.
However, please bear in mind that this process is easier to use and gives *much* better results on larger images.
Pasting the Field Image over the Sky Image
|
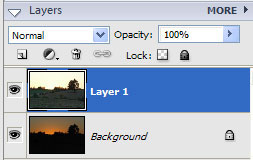
Layers Window
|
Click on the Field image and then copy it by doing Control-A and then Control-C.
Click on the Sky image, and paste the Field image over it by doing Control-V. It
will be added to your layers window as "Layer 1" (if your layers window isn't visible, go to the menu
and click Window and then Layers). At this point, the Sky image will seem to disappear.
|
The MaskCurrentLayer Action
|

|
Make sure Layer 1 is selected, and create a mask by running the MaskCurrentLayer action.
|
Layers Window After Running MaskCurrentLayer
|

|
This is what your Layers Window will look like after running the action. A mask has been added to Layer 1.
|
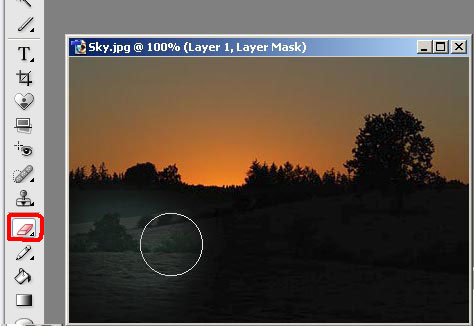
Tools

|
Make sure that the Layer Mask Thumbnail of Layer 1 is selected (it should be, by default),
set your foreground color (marked as "1" in the screenshot to the left) to black and use the Paint Bucket Tool (2) on the image. This will fill
the mask with black.
Now the Sky image is visible again.
In the toolbox, click the Eraser Tool (3), and in the brush presets list, choose
one of the soft, large brushes. Set the size to somewhere between
100 and 300 or more, the mode to Brush,
and the Opacity to about 20% or less. Make sure the background color (4) is set to white.
Now make repeated passes using the eraser tool on the image to "erase" the mask over the field area slowly,
until you achieve the effect you want. You will have to remove your finger from the left mouse
button between passes.
Adjust the brush size and opacity to fit your particular situation.
|
Using the Eraser Tool
As you can see below, the Field image is starting to appear. You control how much of it appears by
how much of the mask you erase. If you erase too much, you can set the background color to black,
and "unerase" it.
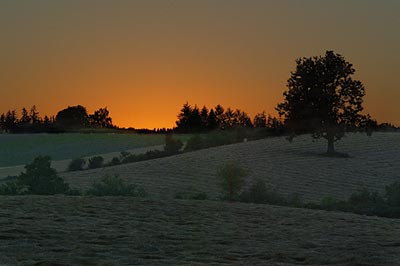
When you're happy with the image, save it as a Photoshop file to preserve the layers. For a web copy,
flatten the image (Layer/Flatten Image), resize and sharpen, and use "File/Save for Web" to create a compressed
web version. Here's the final image:
Conclusion
I realize that there are those who might consider this to be "cheating," and I respect that opinion,
but I really can't agree. I didn't add anything that wasn't in the original exposures,
and in fact the final
result looks much more like reality than either of the individual images.